Understanding Craft Distillery Startup Costs

The Craft Boom

It’s 2019 and the craft business is booming. There are many different versions of craft that fall in line with that saying, i.e., craft eateries, craft jewelers, and even craft candle makers. While the craft brewing business has been on the up-and-up for the better part of two decades, craft distilleries are plowing their way into the market.

While St. George Spirits and Anchor Distilling started last century, along with a few others, the last 5-10 years have seen a real boom in craft distilleries. According to the American Craft Spirits Association, 2018 ended with a total of 1,835 – another double-digit percentage increase to go with the years prior.

2019 is seeing that trend continue with more and more people looking to open their own craft distilleries. However, there are a lot of craft distillery startup costs and considerations involved in bringing those dreams to fruition. Here are a few:

Money, Money, Money: Craft Distillery Startup Costs

You’re going to need it regardless of what you might think. There are many ways of funding craft distillery startup costs, and it’s important to choose your best option(s). Not everyone has pockets deep enough to go out and build the masterpiece that is floating around in their brains.

While having deep pockets is nice, many turn to small business loans. From SBA loans to business lines of credit, you have options, but no matter which financial route you venture down, you’re going to need a well-thought-out business plan.

Most banks and lenders will want to see what you have laid out and how you are going to accomplish those plans. Convincing them to front you the money is not easy but coming in prepared with as detailed of a business plan as possible will help your case.

If you can’t obtain a loan, or just don’t want to, you can go the route of investors. Same as a loan, investors are going to want to see a solid plan. They are also going to want a piece of the pie, and that’s where you want to pay attention.

Using investors has been a successful strategy in starting a business for years. But at what cost? You want to make sure you are comfortable with how much you are giving up to them, as you don’t want to paint yourself into a corner. There has been more than one instance where an investment group pushed out the founder and left them high and dry. But, by doing your due diligence, you can bring in an investment that benefits all involved while continuing growth for years.

Many people start with a contract distiller. While some of the true “craft” enthusiasts frown upon this, it can be an affordable way to break into the business. Have a contract distiller help you make your product while you focus on building your brand. Use your own sweat equity to build the funds you need, and then build your own craft distillery and bring it home.

These are few options for funding your craft distillery startup costs, but where do you spend that money? While there is a plethora of ways to spend it, I want to focus on a few important pieces.

Physical Space

Whether you build out a custom building or lease a small bay, you’re going to need a space. In most cases, this will be your biggest initial expenditure.

  • Know your local/state laws so you can outfit your building in the most optimal and profitable way to take advantage of those laws.
  • If you can make cocktails on-site, you are probably going to want to dedicate a good amount of space to a tasting room. Even if you can’t make cocktails, laws do change, so have a contingency plan. (Are you listening, Florida?)
  • If you know you’re going to be making vodka, make sure you have enough ceiling height to accommodate the many plates you’re going to need.
  • Focus on your electrical and water sources, as they are integral parts to a distillery. Finding out that you don’t have enough power after signing a lease can be costly. We’ve had customers that got hammered for tens of thousands of dollars to get to the appropriate infrastructure.
  • Think about the location, location, location! This can be a big one. If you are anticipating high foot traffic, try to find a location that suits that. Getting customers into the distillery is much easier when you are in a convenient spot, especially around other social businesses.

(If you’re only focused on manufacturing, location isn’t as important. Just find a space that is conducive to your production needs.)

There are several factors that come into play when choosing a space for your craft distillery; these were just a few of the larger ones.

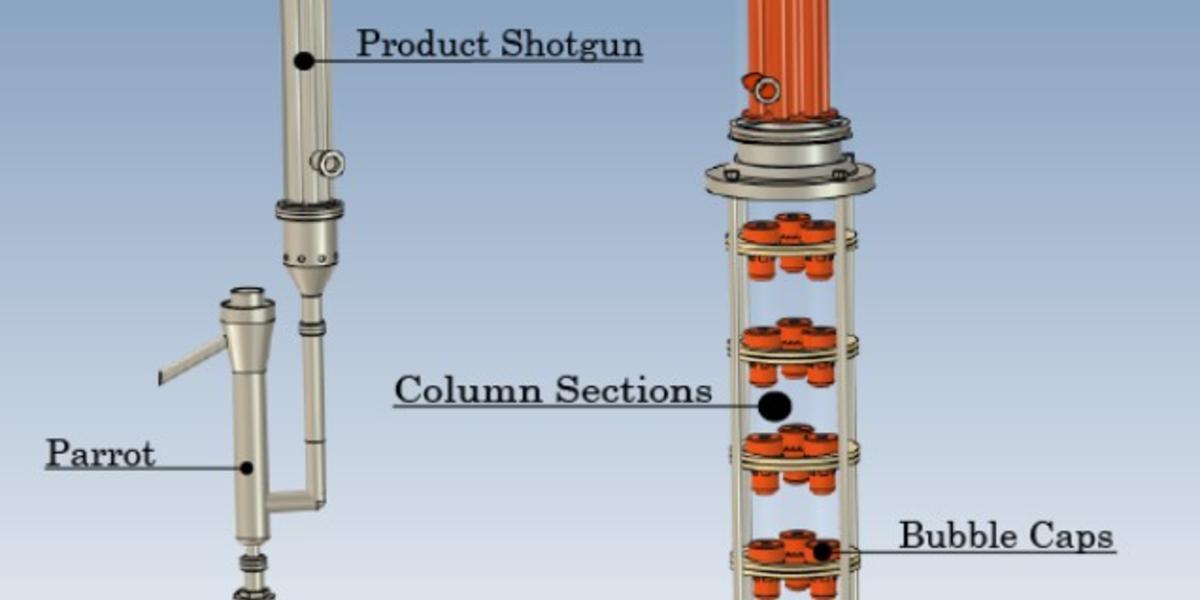
Craft Distilling Equipment

You can’t distill craft spirits without equipment. In your business plan, you need to decide what products you want to make and how you want to make them. You should also have a growth plan so you can size your craft distilling equipment accordingly. Once you know those things, you’ll have an idea of what kind of equipment you need.

As a manufacturer and seller of distillery equipment, StillDragon has come across many different situations concerning the initial equipment purchase. There are several types of systems, each needing its own specific tools or pieces. Don’t buy a steam jacketed kettle if you can’t afford a steam boiler.  And don’t buy a large, electric-fired setup if you only have 50 available amps to the entire building.

As mentioned earlier, craft distilling equipment can be costly. You don’t want to size your equipment too small, but at the same time, you don’t want to go too large. As a seller of equipment, it’s StillDragon’s job to find out what you want to accomplish.

  • How many hours a day do you want to work?
  • How many days a week?
  • What kind of production goals do you have?

If you’re looking to sell 1,000 cases a month but only work two days a week, I would consider staying away from a 25-gallon system! Think about what you want and work with your equipment manufacturer to get the properly sized equipment.

Going back to foot traffic, if you want a lot of copper, just know that it comes with a price. Having that nice showpiece can work wonders for your business. People love shiny things!

However, make sure you don’t blow through your whole budget on craft distilling equipment. As shocking as it may seem, being in sales, we’ve had to talk people out of spending too much on equipment. Leave some money for the other things. The idea is to get what you need, grow, and then come back and see us for an appropriate upgrade.

Money, a physical space, and equipment are super important, but this next topic seems to be the most important.

Don’t Overlook Sales and Marketing Craft Distillery Startup Costs

This is vital to the success of your business. You should have a clear budget and a proper plan for spending that budget. You can make the greatest whiskey in the world, but if you can’t get it out to market, no one will ever know.

Not calling out a specific brand, but we’ve seen some products that are all over the country but taste like toilet water. (Assuming we’ve tasted toilet water, which we haven’t!) Those products are out there due to solid, and sometimes expensive, sales and marketing efforts.

Take your time and check with different marketing agencies. Find the one that seems to understand your vision and wants to help you grow.

Next, put boots on the ground! This is another huge factor that can’t be emphasized enough. You want to be out and about with your product any chance you get. The human brain recognizes repetition. If you see something over and over, eventually you’re going to inquire about it. Tastings, farmers’ markets, bartending competitions… be there. Try to get your brand out there in front of as many people as you possibly can.

Bottles and labels come into play within this area as well. Find a bottle and label design that will pop and stand out on a shelf. I know I’m not the only one who has purchased a spirit before based on an eye-catching label. It doesn’t always work out the way I want, but then again, toilet water!

Opening a craft distillery is a dream come true for many people. But doing it right is a MUST for those same people. Take your time, do your research, and focus on the task at hand. Doing these things can only benefit you in the long run. Attack your business plan, and work on the next step without skipping any steps in between. And, when you are up and going, send us a bottle!

Need help choosing the right craft distilling equipment for your startup? Contact the team at StillDragon today. We are happy to help!

How a Distillation Column Works

Column Distillation 101

The only real “moving” distillation column parts are the agitator, wash/beer, and the vapor, and boy does that vapor move! Column distillation is really just phase change over and over again on the plates until the contents reach your product condenser, where they are turned into a liquid for good — to be consumed as a craft spirit. While it seems like a pretty easy concept, knowing and understanding why each part is in it’ specific place is important to a good run.

You start the process with your fermentation (a process for another time) becoming your wash, beer, or kettle charge in your pot, keg, or kettle. Once you are ready to turn it into ethyl alcohol, you’ll turn up the heat, and if equipped get the agitator going to more evenly distribute the heat, until it emits a vapor traveling up the column. At this point, StillDragon prefers to use the plates and bubble caps system due to its wide and forgiving operating range.

So, the vapor travels up and along the path of least resistance through the bubble caps on each plate. If you’re early in your run, there will be little to no liquid on each plate, and the vapor will continue the upward movement until it hits something cooler and condensates, where it will create a liquid bed on each plate. And just like that you’ve completed one distillation cycle.

The vapor is going to continue this pattern multiple times for as many plates as you have in your column. The fun, scientific part (as if it wasn’t already fun science) is when the liquid beds form, the vapor traveling through the bubble caps dissipates into each liquid bed, causing the liquid to reheat (because the vapor is hotter than the liquid) and each plate to start to boil, thus creating more vapor on the up and up.

You’ll also notice the plates contain caps that look more like cups. These allow liquid to overflow into them, draining back to the plates below to vaporize at a later point. This also ensures that the plates don’t flood and the vapor properly heats your liquid bed.

Every time the vapor condenses and then turns back into vapor, phase change has occurred and completed a distillation cycle. This also happens at the top of the plated column, in what we call the dephlegmator (de-fleg-may-ter). Now, this gem of a contraption is a tube in the shell condenser, with through pipes that are large enough to allow two-way movement. So, at some point in your run, you will have vapor continuing the upwards movement, while some of the vapor gets knocked down onto the plate below.

The vapor that passes through the condenser travels toward the end of the road, or the shotgun condenser. This is another tube in the shell condenser, but this one has much smaller through pipes to create more surface space for the vapor to be knocked down.

The vapor is now in its final liquid state, and will be pouring out of the parrot. Don’t forget to stick your alcometer in there to see what ABV you’ve created!

And that’s the basic, beginners version of column distillation. It is recurring phase change, assisted by distillation column parts like copper plates and bubble caps, until it hits a cooling condenser, where it turns into the final liquid state, also known to the young kids these days as “liquid courage”. (In other words, those liquor labels that say “7x distilled” may have been created on a 7-plate column.)

If you’re looking for a more in-depth understanding of column distillation, check out the StillDragon community forum. It is full of questions and answers provided by distillers from the early stages to the more seasoned.

Batch Distillation and Alcohol Shifting: Exploiting Positive Feedback for Optimal ABV

Introduction

The thoughts and ideas contained here have been formed through fundamental batch distilling with the distillation apparatus more widely known as “The Humper Thumper”. Furthermore, some of the concepts and theories went on to be tested by other members within the distilling community. Though much of the data is anecdotal, most of the participating testers also came to very similar conclusions.

Send Nothing Back

The first assertion being that, for optimal kettle behavior, the operator should never allow any previously distilled alcohol to return to the kettle for what should be obvious reasons. The alcohol has already been through mass transfer. It has already consumed a costly BTU expenditure. No need to generate additional heat to do what has already been done.

The second assertion is that not only do we not want alcohol returning to the kettle, but we also need to prevent (or greatly reduce) any water from returning to the kettle to only further dilute any remaining alcohol within the kettle. Further dilution will require an additional measure of heat that was previously not needed.

In other words, it takes more heat to liberate alcohol from a 3% mixture than it takes to liberate alcohol from a 10% mixture. Therefore, sending water back to the kettle only perpetuates inefficiency by using an additional, compounded amount of heat to liberate any remaining, usable alcohol contained within the primary kettle.

How Do We Do That?

Let’s start with a typical primary kettle and a good rule of thumb that if we strip beer into low wines, we will render approximately 1/3 of the total kettle charge as low wines. Therefore, we could say that once stripped, 100 gallons of beer would yield approximately 33.333 gallons of low wines.

Connected to the primary kettle, a concentric, inline retort would act as our first plate. We can refer to this retort as a distilling thumper that has a liquid level maximum fill volume that is the equivalent of the potential low wines yield of the primary kettle. So, in this case the thumper is sized to a working volume of about 33 gallons.

Then mounted to the retort, a 3 or 4 plate column with relatively deep liquid beds. To summarize this section, the distilling thumper volume and plate volume in the column needs to equal the total potential yield originally contained in the primary kettle.

The large bottom “plate” of the thumper acts as a liquid hold up device that prevents the return of any liquid to the primary kettle. The thumper does however have an overflow drain that does prevent complete flooding of the vessel should the operator become too complacent.

Shifting Alcohol via the Distillation Apparatus

Once the beer charge has been brought to running temperatures, the distillation apparatus is put into 100% reflux mode with the Dephlegmator. This prevents any alcohol from exiting the distillation apparatus by passing over to the product condenser.

Once heat and pressure are applied to the system, a mixture of water vapor and alcohol vapor will make its way toward the exit and the dephlegmator (reflux condenser) will condense the vapor back to liquid form and the resulting condensate will fall back onto the highest plate elevation.

This process happens many dozens, if not hundreds of times. Once the top plate fills with liquid it will then drain down to the next plate level and so forth and so on. All the while, forthcoming vapor from the primary kettle will continue to enter the distillation apparatus.

So, we have liquid draining downward as enriched vapor rises toward the top of the apparatus. At this point, it will be the lightest constituents within the column that must occupy the highest available space.

Ethanol is lighter than water, and with each phase change cycle of liquid to vapor and back to liquid, the water within the apparatus will be essentially walked back down the apparatus by virtue of overcrowding on the plates.

The lighter constituents must occupy the highest available space when heat is applied. And so, the column fills with alcohol as the water within is cycled back down. This behavior is positive feedback, meaning that at each plate level, the liquid will require less heat in order to get the alcohol to flash for the next cycle of phase change.

Each liquid bed on each plate level acts as a condenser for incoming vapor. And since the liquid bed is made up of mostly alcohol, the liquid bed will then determine the next forthcoming flash point of alcohol at that plate level. This is called temp gradient.

Ultimately, we hope to manipulate the gradient by so fully enriching the apparatus with alcohol as water gets walked down the apparatus and into the distilling thumper, and at the same time exploit positive feedback to optimally enrich the very top of the apparatus.

As previously mentioned, at no point during this phase of operation are we collecting any product. We are simply creating many, many phase change cycles to get the highest percentage of alcohol into the column section as possible.

More on Positive Feedback

This notion of this positive feedback type behavior can be confusing for beginners. Let’s simplify in a way that helps us understand better. So, let us think of negative feedback in order to understand positive feedback better. Specifically, let’s think in terms of electronics.

In electronics the definition of negative feedback is: “The return of part of an output signal to the input, which is out of phase with it, so that the amplifier gain is reduced, and the output is improved.” What does that mean? Some of you high school stagehands or old band mates likely remember this phenomenon?

If you put a live microphone next to a speaker, you can expect that the recirculation of sound frequency will recycle from the speaker to the microphone and back out from the speaker so rapidly until the speaker ultimately has a catastrophic failure due to excessive amplification.

The sound frequency gets caught in a vortex of never-ending circulation that continuously amplifies itself until the speaker eventually has a catastrophic failure. This is negative feedback.

Positive feedback is very similar in that with each distillation cycle, or amplification, mass transfer moves alcohol closer toward the top of the distillation apparatus.

And in doing so, each subsequent phase change cycle becomes easier because it requires less energy to initiate that phase change as the flash point requires less heat. In other words, the boiling point of the liquid on each plate is reduced as enriched vapor ascends to the top of the apparatus.

The good news is that ultimately there can be no catastrophic failure because ethanol has a limit to how much it can be amplified. Ethanol has a built-in safety mechanism really. Notwithstanding vacuum distillation, ethanol cannot be distilled to 100% purity with equipment that is otherwise used for the purposes of making spirits.

Certainly, high proof alcohol is very flammable. But it is the ethanol itself that puts the brakes on catastrophic failure as compared to our microphone and speaker demonstration.

Conclusion

So, essentially what we are doing is optimally heating our beer enough to shift all available alcohol into the distillation apparatus. During this time, we will initiate reflux to create an optimal environment to exploit positive feedback.

We are simply provoking phase change cycles while continuing to shift all alcohol from the primary kettle into the distillation apparatus. All the while, we will not drain any condensate (water or alcohol) back to the primary kettle by virtue of our deep liquid bed capability on our oversized first plate.

During this phase of operation, it is important to note that as soon as the liquid level in the distilling thumper fills to the point where liquid must return to the primary kettle, efficient behavior will incrementally reverse, and the system will then start a downward trend in purity.

Therefore, it is important that the operator execute the reflux period and pay close attention to when to start collecting product according to how long it will take the thumper to completely fill and return water and alcohol back to the primary kettle.

Nothing here is new here with respect to basic distilling with forced reflux. The difference that I have explained above, is that the distillation apparatus is specifically sized for the kettle charge volume. And during the 100% reflux period, the system is more able to exploit positive feedback behavior.

And in doing so the operator can expect very rapid collection speeds at stable, higher ABVs with a smaller plate count. This method explained however is not optimal for neutral spirits as flavor congeners do get entrained into the relatively small system because of the deeper liquid beds.

Just a reminder that high ABV does not necessarily equal a more neutral finished product. This system described likely performs best when the promotion of esterification is most desirable. But that is another discussion for another time.

Should you have any questions about selecting the right distillation apparatus for your needs, please don’t hesitate to contact the team at StillDragon North America.

Where to Pack Your Vodka Still Column

By: Larry Taylor

On more than one occasion I have been asked about mixing different distillation mediums. Whether or not to install packing material (random or otherwise) above or below the actual plate sections in your vodka still column?

This type of hybrid solution can help a small startup distillery save money on equipment and save valuable ceiling height typically preferred to run a “proper” vodka still column. It goes without saying, however, that it is ultimately up to the distiller to decide if the ethanol molecules have been sufficiently scrubbed enough to render the finished product clean enough to be considered “proper vodka.” Therefore, requisite plate (theoretical or actual) count is subjective.

Frankly, you can probably make the apparatus perform in any configuration. But you’ll get more optimal behavior with the packed section installed above the actual plate assemblies. And by that, I mean that actual plates (deeper liquid bed) will promote a sturdier temp gradient (compared to theoretical plates) that will be less affected by what will become unneeded heat emanating from the kettle.

In other words, the amount of heat needed in the kettle ultimately becomes unneeded in an optimally enriched still column – particularly at the top of the apparatus, where product is drawn off.

First, as a preface, check out a distillation temperature and concentration relationship chart for some background on the relationship of temperatures for liquid alcohol mixture / alcohol vapor temperatures.

Next, let’s dig into the distillation theory:

  • It will require more heat to render alcohol from an 8% kettle charge than from a 15% or 20% charge. Therefore, the kettle requires at least twice (notwithstanding heat losses) the heat to render alcohol compared to heat needed at any of the plate levels. But the heat generated at the kettle has to go somewhere – usually straight up the still column to impact the temperature gradient. That’s an important point.
  • Actual plates generally have a more abundant accumulation of liquid in a more confined place. So, one would say that plates maintain a dense liquid bed. The liquid that accumulates in packing (random or structured) is more or less in the form of accumulated droplets. Thus, the plates have a more dense accumulation of liquid in a smaller amount of area.
  • The very first job or task of the liquid bed is to condense incoming vapor. And the deeper the liquid bed, the more capacity it has to absorb heat. So, this liquid on the plate is a cooling medium. And since this cooling medium is made up of a mixture of alcohol and water, it will be the percentage of alcohol on the plate that determines at what temperature vapor will flash and how much heat at that point is permitted to rise up to the next plate level. Therefore, the % of alcohol on the plate determines (self regulates) the temperature needed to allow further vaporization. In other words, a deeper liquid bed absorbs heat better, while the ABV on the plate determines the forthcoming flash point. Liquid droplets in packing have less ability to absorb what will become unneeded heat. Unneeded heat allowed to migrate up the still column shrinks the gradient and permits more water infiltration further up the column. That makes for lower ABV.
  • The deeper liquid bed helps create a sturdier temperature gradient and relieves the burden off the packing to manage unneeded heat. This will allow cooler temperatures (higher ABV) to migrate farther down the column. This behavior acts to more completely enrich the packed still column and allow it to otherwise run faster without compromising the ABV.

I hope I explained the distillation theory with some measure of clarity. To summarize:

  1. Shifting as much alcohol as possible from the kettle into the still column will promote a more optimal temperature gradient. Fixed (bubble cap) plates will literally hold up liquid without regard to pressure. Packing must rely on pressure for liquid hold up. So, even though packing facilitates more potential distillation cycles (good behavior), the lack of liquid mass allows for more heat intrusion closer to the top of the apparatus (bad behavior).
  2. Minimize previously distilled alcohol from returning to the boiler too quickly.
  3. Utilize the larger liquid bed as a heat exchanger / buffer zone to minimize heat intrusion into the top of the apparatus.

For more practical tips and advice like this, stay tuned to the StillDragon distilling blog and be sure to check out our online forum.

How to Choose the Right Distilling Equipment

Buying durable alcohol distillation equipment is the foundation of running a successful craft distillery. To find the right craft distillery equipment, you must begin with a general understanding of what distillation is and where in the equipment the process occurs.

1. Understand distillation 101

Distillation usually happens in the column, separating the alcohols from the wash using multiple cycles of condensation and evaporation. The alcohol vapor produced by heating the kettle rises to the column, where it finds its way through the bubble cap and, depending where you are in the run, meets the lower proof alcohol bed on the plate. As the hot vapor meets the liquid bed, the heat disperses, raising the temperature of the liquid bed and creating more steam.

This heat transfer phenomenon happens on each plate. Liquid has a lower temperature. Steam has a higher temperature. The higher purified ethyl alcohol becomes steam to be condensed the next cycle (each plate is considered a cycle). The more plate sections per column, the higher the purification.

2. Select the number of plates

If you want to make vodka, StillDragon recommends at least an 18-plate column. The more plates allow for more phase changes, creating authentic and pure vodka. However, more plates do require a longer run time.

For the whiskey makers, a lower number of plate sections is better, as whiskey requires more flavor than purity.

Note: There are no factual studies proving the final product flavor in a bigger system is greater or lesser than a smaller distilling apparatus.

3. Identify the type of still

Did you know there are multiple types of stills? Differentiating between these still types can provide insight into which will alcohol distillation equipment will create your desired spirit:

  1. Pot still – Consists of a big pot, swan neck (a.k.a. lyne arm), and condenser. Distillers heat the alcohol in the pot, forcing the steam to go through the swan neck, where some of the liquid drops back into the pot and some steam flows to the condenser. A taller swan neck creates more reflux during the distilling process, creating a lighter alcohol for the final product. A shorter swan neck has a lower temperature gap during the reflux, creating a more natural and mellow alcohol.
  2. Reflux column – Consists of a pot, column with copper plates, lyne arm, and condenser. The more plates you have, the purer the alcohol. The fewer plates you have, the more flavorful the alcohol. Reflux stills come in various types, but the three main ones are:
    1. Liquid management (LM) reflux still – A needle valve typically controls the release of liquids back down the column.
    2. Vapor management (VM) reflux still – A tee is placed under the reflux condenser, leading to a valve and the product condenser.
    3. Cooling management (CM) reflux still – A dephlegmator at the top of the column knocks down some vapor, while allowing some vapor to continue to the product shotgun. A CM reflux still also is affected by the power, or heat, thrown at the kettle.

4. Consider your craft distillery equipment budget

Budgeting for alcohol distillation equipment can be very time consuming when planning for all the accessories: irrigation fittings, heating elements, extra gaskets and clamps, etc. Time is money, so be hesitant when the price seems too low. It could mean poor quality welds, future problems, and added costs to fix the equipment in the future.

Don’t forget to do some number crunching to figure out the best size of equipment per liter. Sometimes the smaller investment can cost more per liter, whereas a larger system that costs a little more upfront could produce a better bottom line. Balancing price and quality for equipment is important for success!

5. Find a supplier you trust

Having a great craft distillery equipment supplier is another important step toward success. A good supplier has extensive knowledge of their equipment and of distilling as a whole. Your supplier should be able to answer any technical questions and advise you on the proper alcohol distillation equipment needed for your craft distillery. Following are some tips on how to research any potential supplier:

  • Look for longevity – A more established company doesn’t necessarily mean that they are the best, but it is an important standard for you to know that they will still be around in the long term.
  • Check their reputation – See what their customers have to say, ask for references, and stalk their social media accounts!
  • Evaluate their customer service – They should not only continually support their equipment, but also be able to answer questions and service distillery expansions.
  • Ask questions – This is the fastest way to evaluate a supplier’s professionalism. Don’t be afraid to reach out with any questions. There is no such thing as a stupid question!

Get answers to your distilling equipment questions now from the team at StillDragon. Contact us today!

Florida Craft Distillery Law Change Supports Upward Trend

Craft distilling is starting to go the way of craft brewing in popularity: up. In what was considered a positive law change in the craft distillery industry, the Senate passed a bill that would allow craft distillers to sell more to end users. Where they could only sell two bottles previously, as of the date of this post, they can sell four. In addition, the Florida Department of Transportation would be required to install directional signs to local distilleries for customers on roadways — a boon to local distilleries that need the support and visibility.

Also as part of the bill, the Senate voted unanimously to legalize the 64-ounce growler as part of its malt beverages bill. This caused much excitement among craft breweries, as previously these growlers were illegal in Florida — incidentally one of the last states to turn this around. As the industry standard, the 64-ounce growler is the one of the latest additions to the legal containers for craft beers. Previously, only jugs up to a quart or more than a gallon were allowed. This meant that patrons could not take beer home from a craft brewery in refillable growlers (about a half gallon), although the 32-ounce and 128-ounce jugs were allowed.

The language of the bill, presented back in December 2014 for review, gives those in the craft beer business renewed hope for their livelihood. Many craft brewers have been fighting for this law change for many years. But there’s much more to the bill than just wording about growlers, though. Here are some of the highlights:

  • Brewers can open up to eight tap rooms, where they may offer beer samplings and tasting, sales and fill-ups of growlers. This creation of the new limit of eight vendor licenses deletes the tourism exception that was a highlight of the existing law.
  • Limitation of transfers from one brewery location to another to the annual production amount at the location receiving the shipment.
  • Vendor-licensed breweries cannot make deliveries. No exceptions.
  • Beer made by another manufacturer must be sold through the help of a distributor, whereas the previous law was that beer could be sold directly.
  • Manufacturer and distributor tastings can take place at the location of third-party vendors provided they are licensed.
  • Customers can now buy up to four bottles a year at craft distilleries instead of the current two.
  • The Department of Transportation would now have to install directional signs on roadways to local craft distilleries if the owner requests it.

The battle isn’t quite over yet, as the governor still has to put his stamp of approval on the law change. Stay tuned! Meanwhile, StillDragon is your premier source for top-quality, affordable modular craft brewing equipment. Check out the tanks, accessories, components, configurations and more we sell on our website. We are a small family-owned business offering innovative designs in distilling equipment for quick turnarounds thanks to a large, on-hand inventory. We are here to serve you, the innovators and catalysts of the growing distilling movement!

LOOKING FOR EXPERT ADVICE?
WE’VE GOT YOU COVERED.